Release: Jul 26, 2021
Local
1. Lodging Amenities
Opportunity: Improve the relevance of your business profile for ‘near me’ type of searches
Solution: You can now update ‘Lodging Amenities’ on Milestone Local. By doing so, you are adding details about your hotel which will better the search engine’s understanding of what your hotel is offering customers and help it match relevant queries online. In addition, adding amenities enriches the customer experience and helps them decide to choose your hotel over another. For example, adding amenities such as type of payment method, smoke-free property, full-service laundry, and free WIFI will ascertain a customer that your property offers a comfortable stay and improves the chances of your business being the pick.
Please note: The ‘Lodging Amenities’ feature is only available for Hotel, Motel, and Resort business categories.
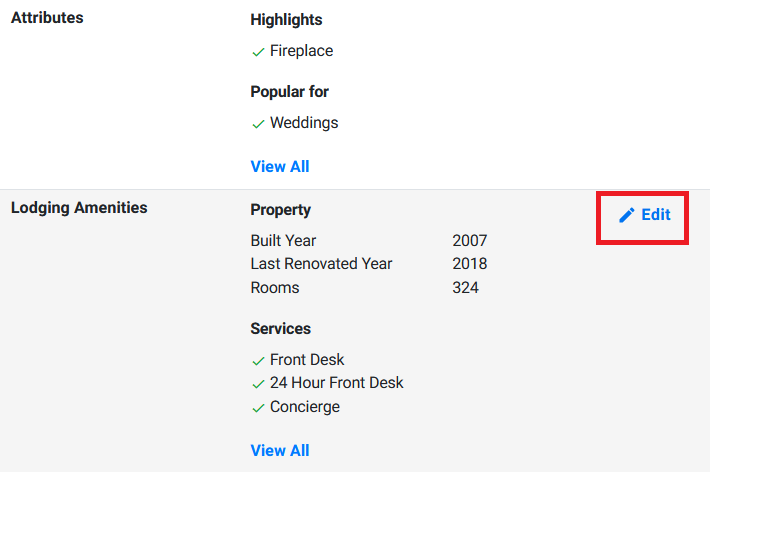
Local > Listing Status > Profile Summary
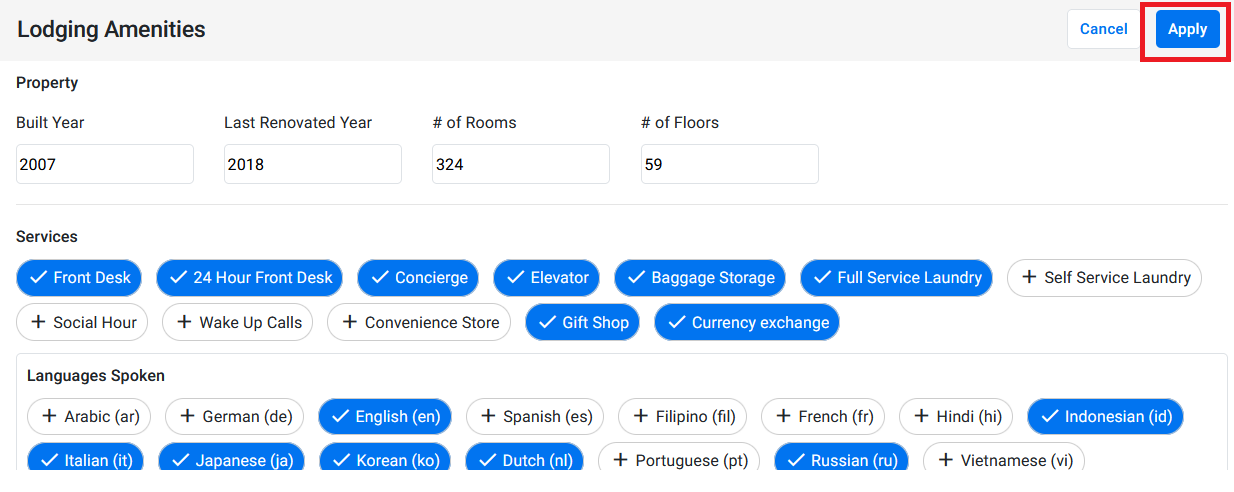
On the right side of the Profile Summary screen, you will find “Lodging Amenities”. You can click on the “Edit” button to add or remove amenities
The “Lodging Amenities” section will require a few basic details like Build Year, Last Renovated Year, Number of Rooms, Number of Floors
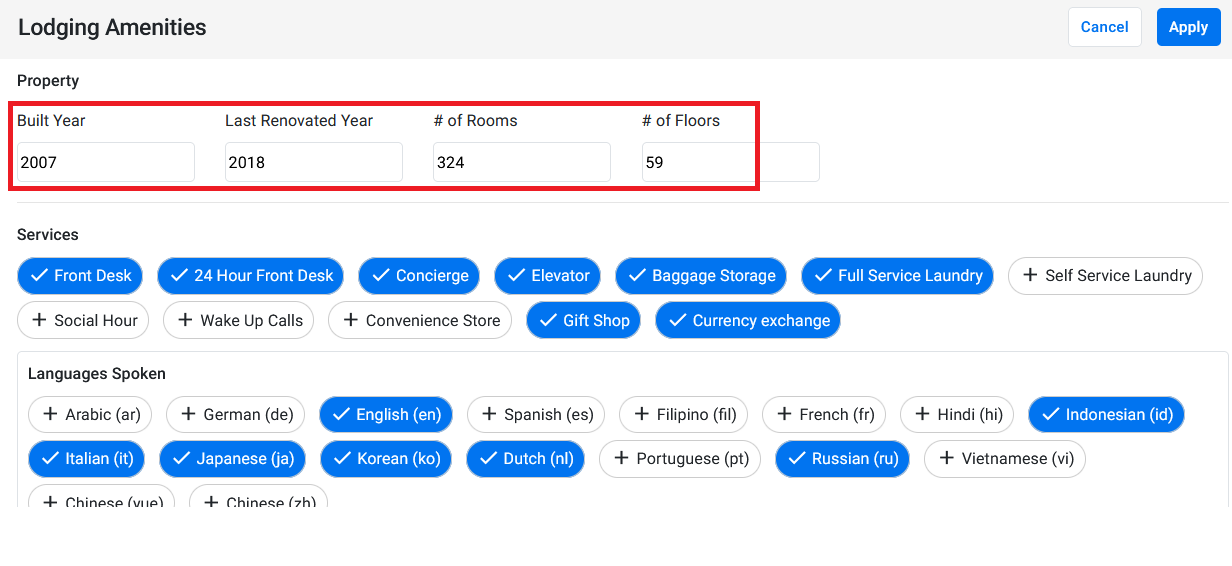
The amenities being offered can be selected below the property details under various sub-categories of amenities
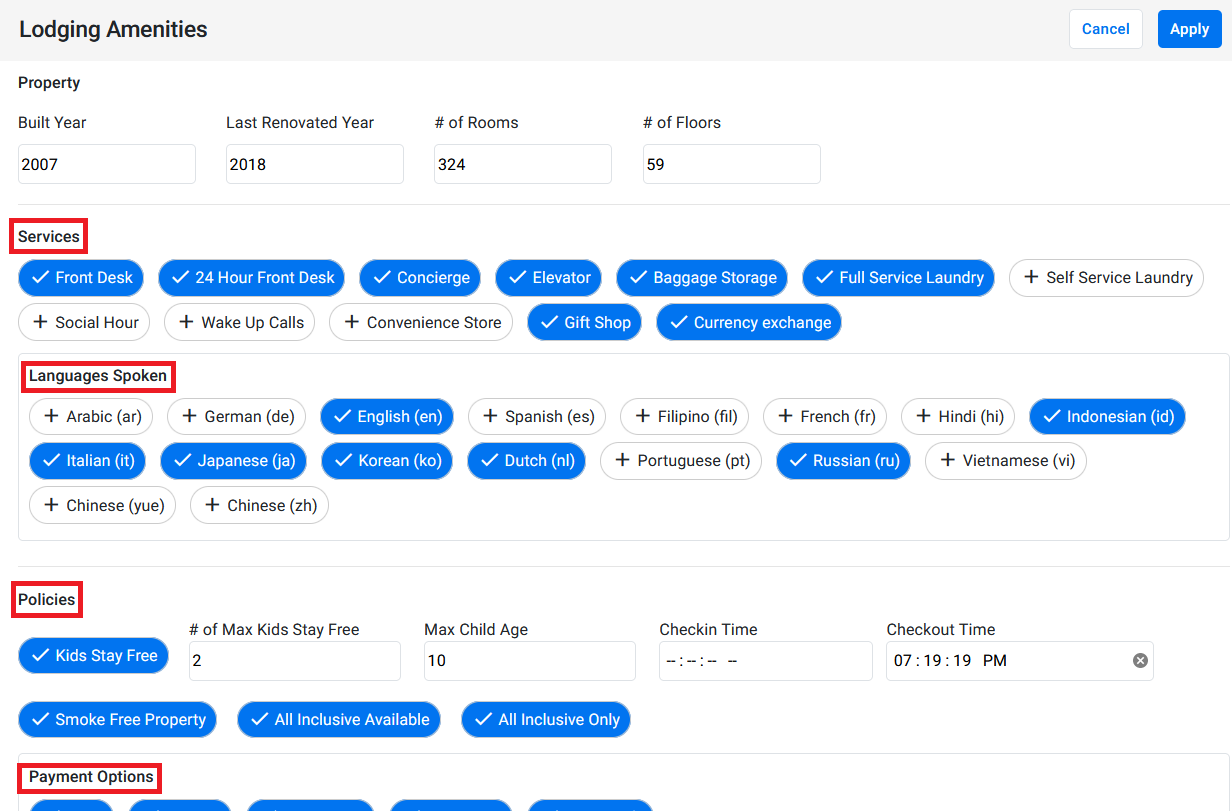
After selecting the amenities being offered, click on ‘Apply’ to update the information for that business profile.
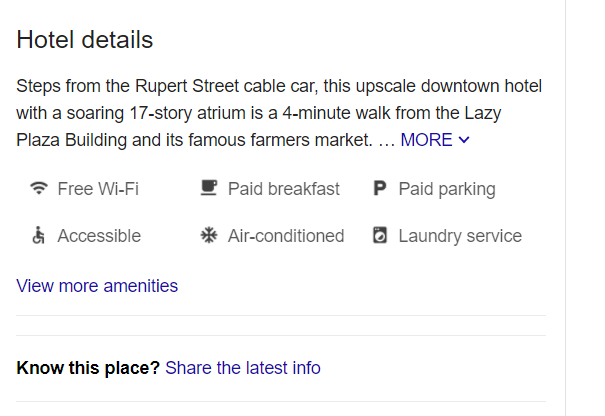
The amenities you add will be displayed under the ‘Hotel details’ tab on Google
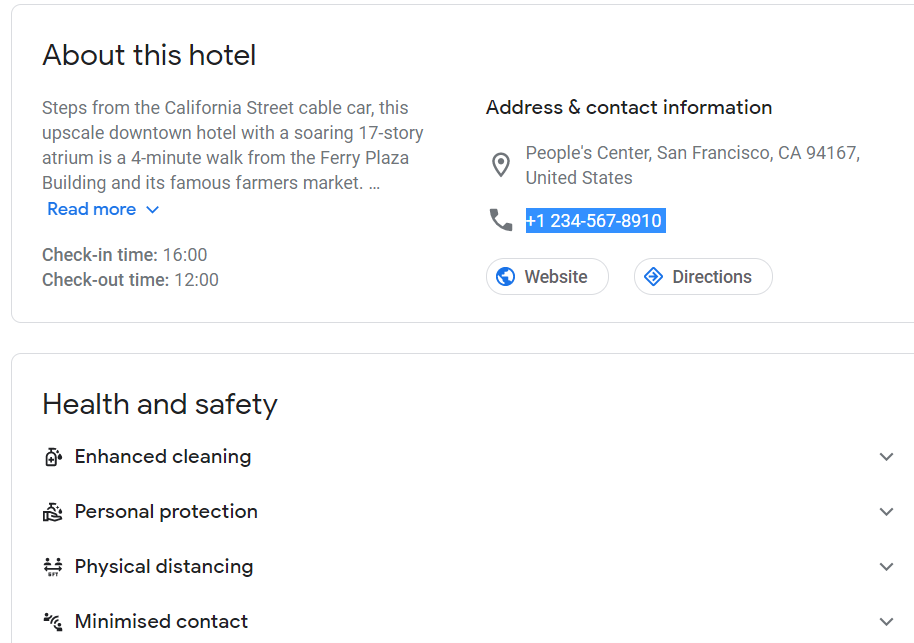
You can view all the amenities from the ‘About this hotel’ tab
FAQ Manager
1. Edit Published FAQs on the Q&A Homepage
Opportunity: Over the course of time the answers to your FAQs may change. Manage your FAQs to make sure your content is up to date and is still relevant to users.
Solution: You can now edit previously published FAQs via the Q&A section to make sure your answers are up to date
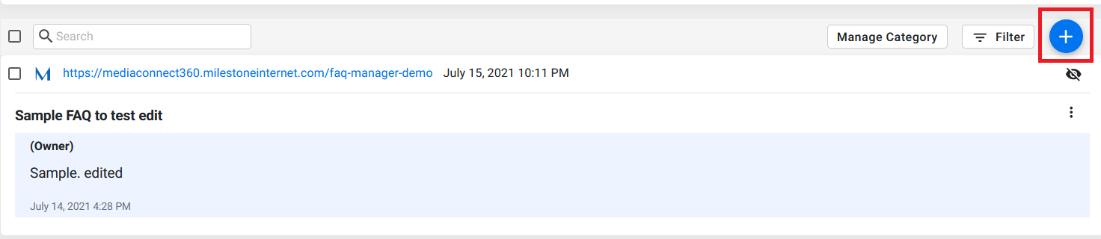
MPC > FAQ/Voice > Q&A
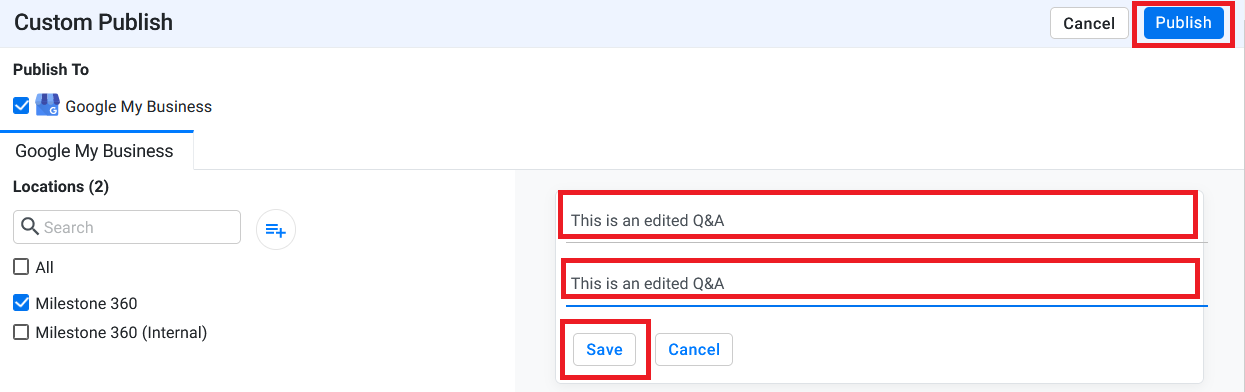
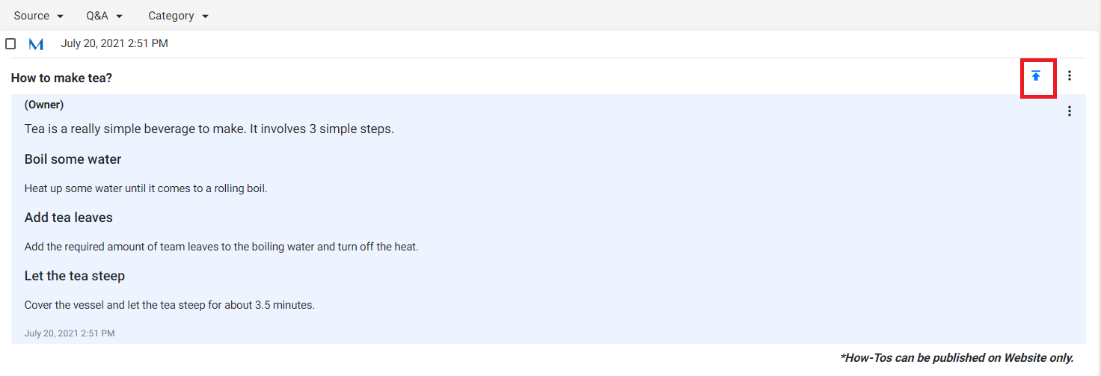
By the published FAQ on the Q&A screen click on the three dots and select “Edit”

You will be re-directed to the “Custom Publish” screen
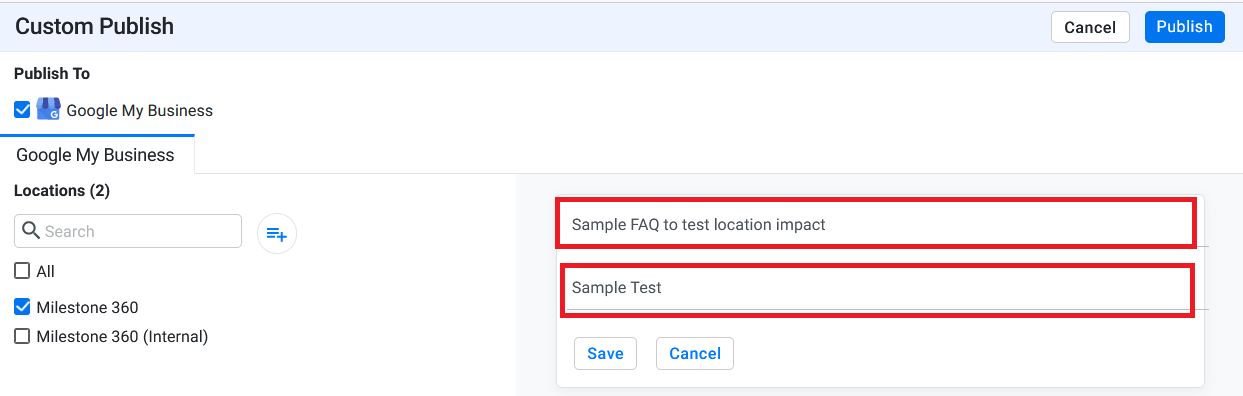
Edit your FAQ, click on “Save” and then click on “Publish”
2. Publish How-to type of FAQs to your website
Opportunity: Support How-to type of FAQs in a step-by-step format to take advantage of Rich results like 'People also Ask', Featured Snippets, FAQs, etc.
Solution: You now have the ability to publish the how-to type FAQs on Milestone’s FAQ Manager to ensure you’re guiding users through any process that they need to follow. The ‘How To’ schema is automatically applied to all ‘How To’ type FAQs making it easier for indexing.
MPC > FAQ/Voice > Q&A
On the right side of the screen click on the ‘+’ icon to add a new Q&A
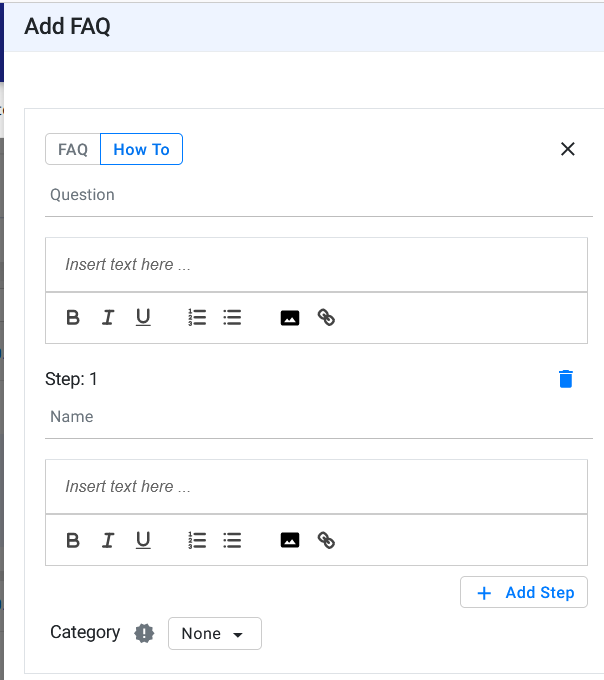
Select ‘How To’ from the question type at the top of the Add FAQ page
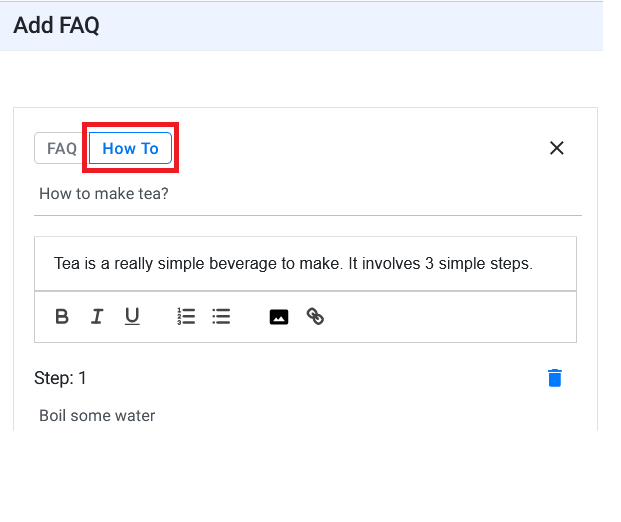
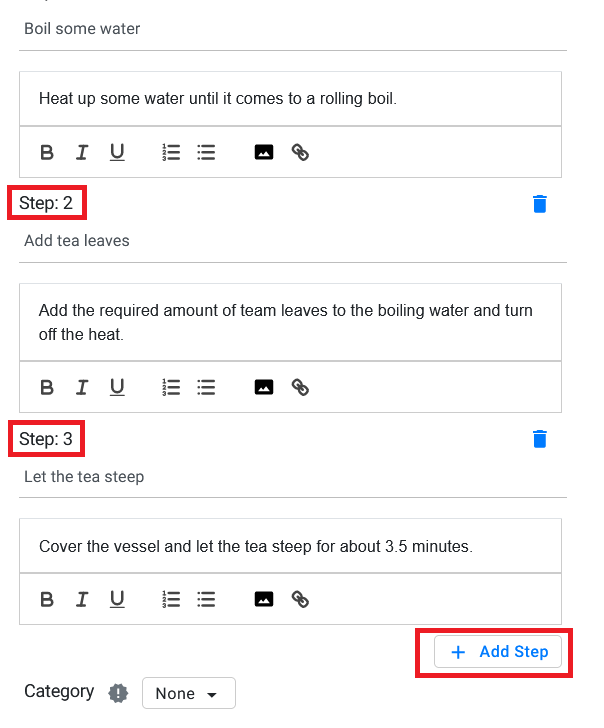
Fill in the fields for the question, answer, and steps
Note: The question provided should be a “How to” type of question. The answer will be displayed in a step-by-step fashion.
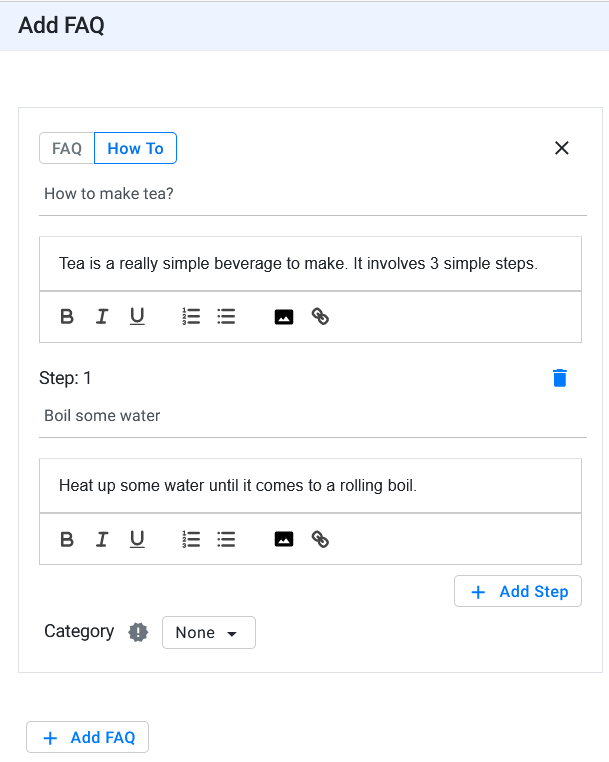
You can add steps with the ‘Add Step’ button on the bottom right
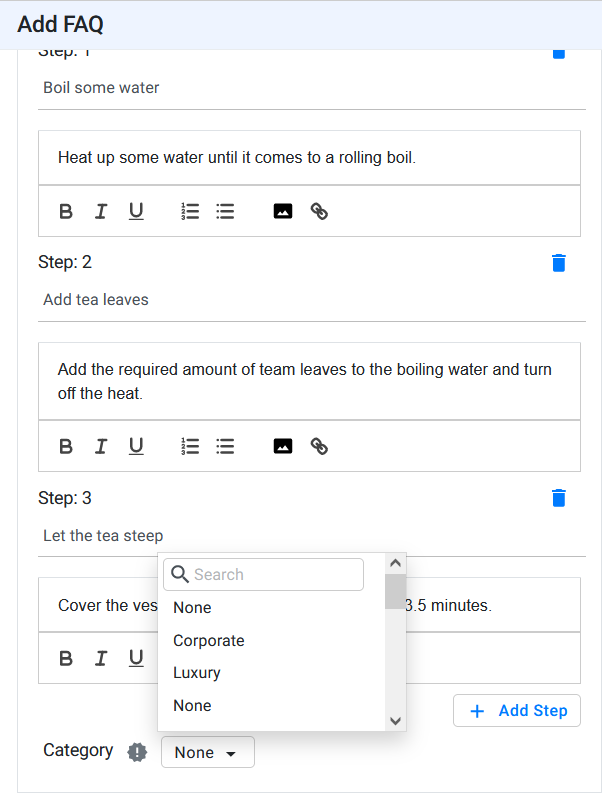
Select a category for the FAQ from the Category dropdown menu
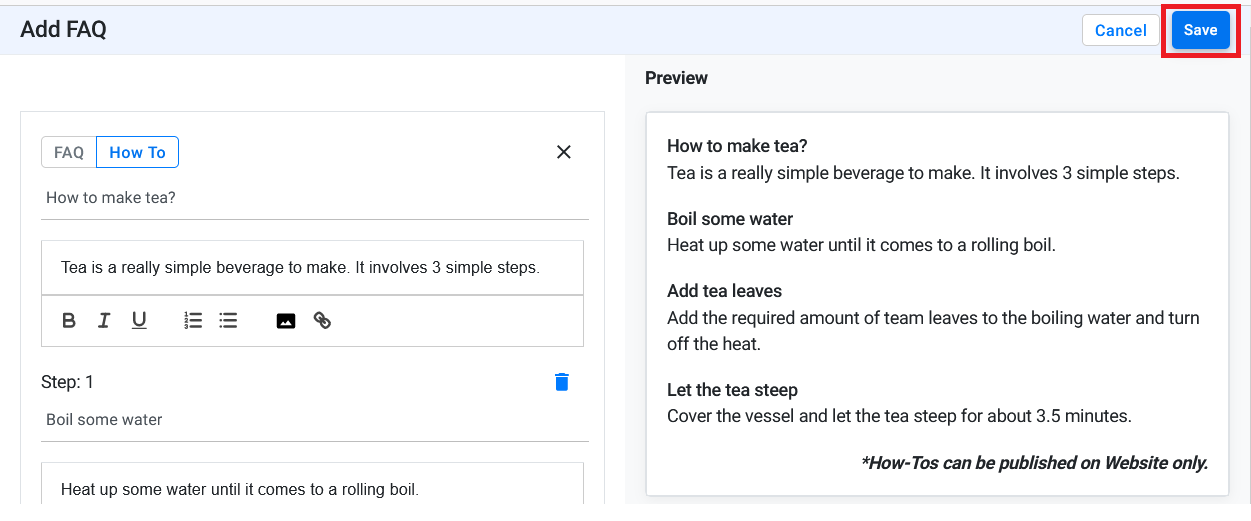
A preview of the format will be displayed on the right. You can view the preview and click on the ‘Save’ button on the top right.
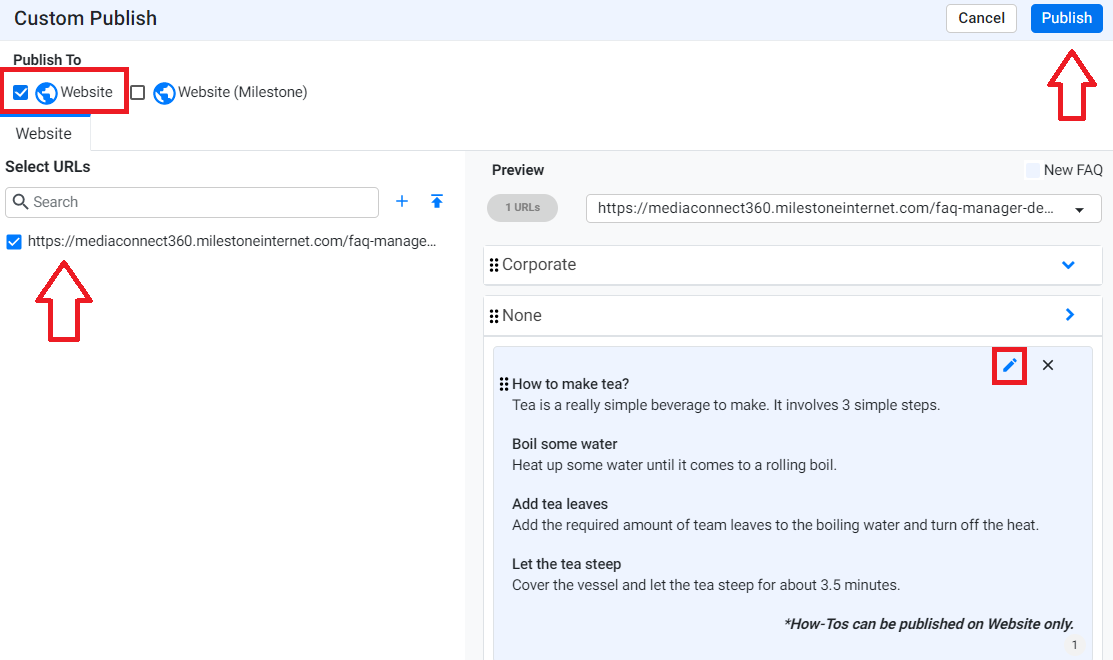
You will see the ‘saved’ How-to type FAQ on the Q&A screen. Click on the ‘publish’ button.
Choose the source where you wish to publish the how-to FAQ, select the URL, and click on ‘Publish’. If you wish to make any changes to the FAQ you can click on the ‘edit’ button.
Schema Manager
1. Global schema - including a schema on all pages without reference
Opportunity: Reduce time of repeatedly tagging schemas that will be required to be added to all URLs of your website.
Solution: You can now include Global Schemas across all your web pages. Previously, you could refer schemas set as global across webpages using @id. That functionality continues to exist but has been renamed to Global Reference.
MPC > Schema Manager > Schema Audit
Select the schema type you wish to add from the dropdown menu on the left
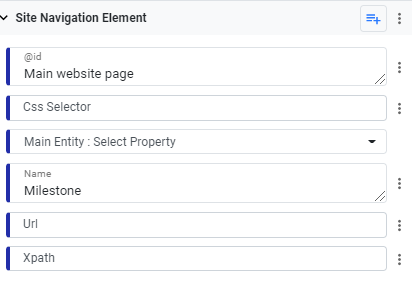
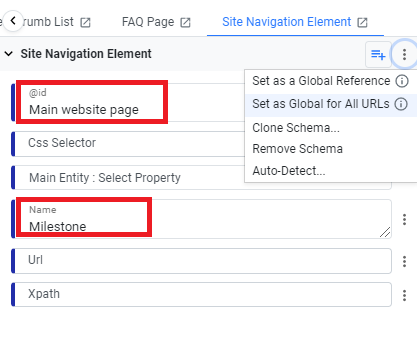
On Schema Editor, click on the three dots on the right and select “Set as Global for All URLs”
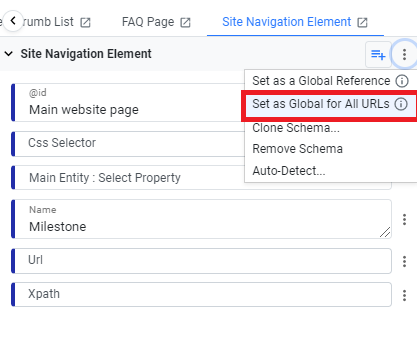
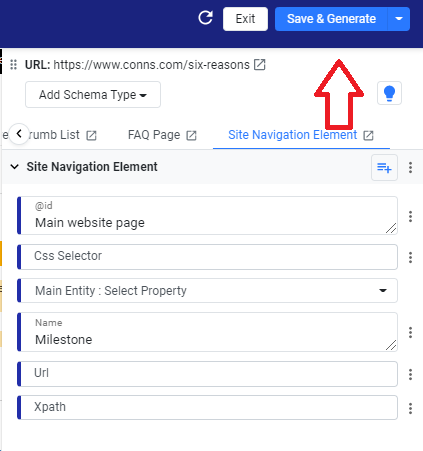
Enter the name and @id for the Global Schema you wish to include across all URLs
Click on ‘Save and Generate’ to save it as a Global schema
Once you have generated the Global Schema you will be able to view the Global Schema that you have added across all URLs. For other URLs, you can choose to disable the global schema using the tick box next to the Global Schema.
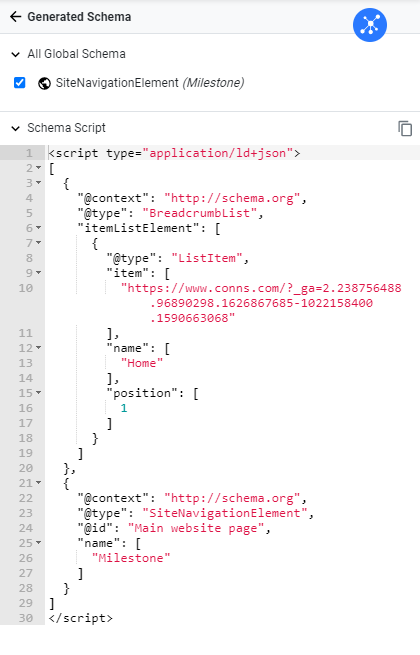
You will now see the global Schema icon next to the URL for which you have declared global schema
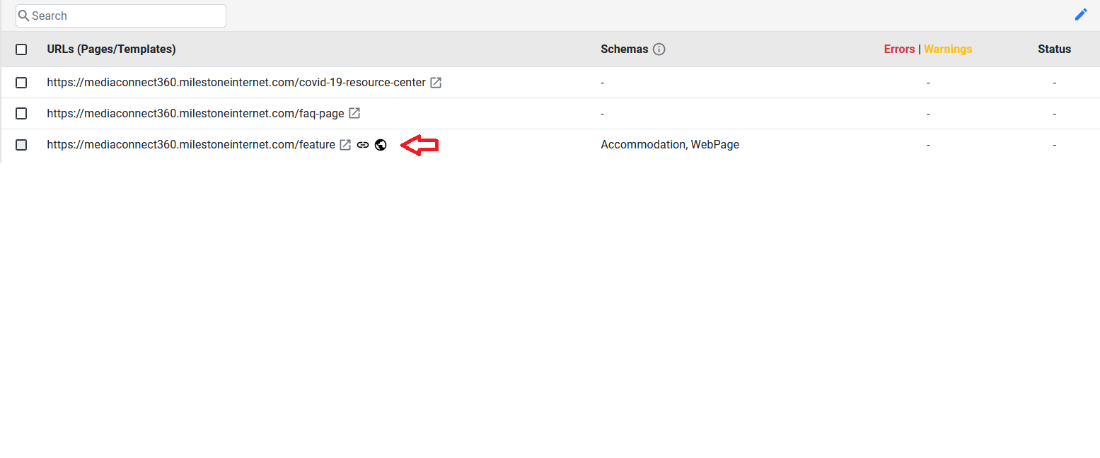
Note: The existing functionality of Global schema is now renamed to Global
reference. The icon of a schema declared for Global reference has
been changed to @. The @ in the icon indicates that it is for reference only.
The icon of the new functionality – Global for all URLs is a simple
globe, indicating that the schema declared is available across all
URLs.
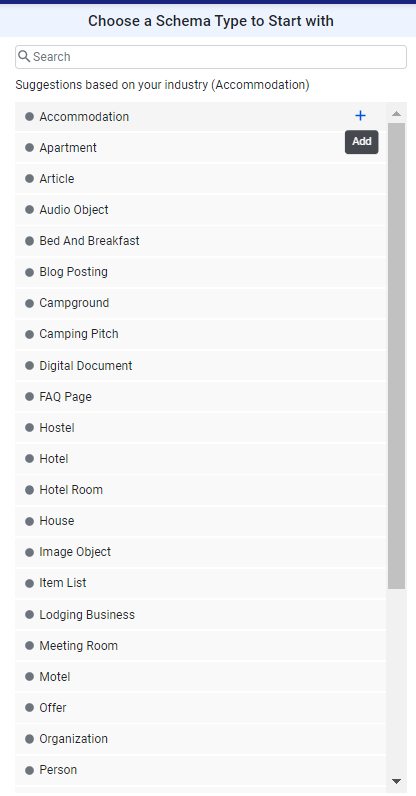
2. Recommended Schema based on Industry
Opportunity: Ease the tagging process by suggesting more relevant schemas to be tagged based on the industry of the business thus aiding in entity optimization.
Solution: With the suggestion button, you can now reference recommended schemas for the whole industry through the entire tagging process and view schemas added by you
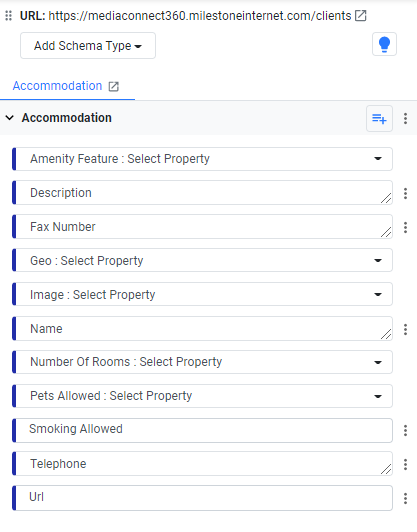
MPC > Schema > Schema Audit > Schema Editor
On the welcome editor screen, you will see recommended schemas based on your industry. Choose the schema you wish you add by clicking on the + button.
Enter the schemas properties for the schema type you just added
And to view the other recommendations click here. You will be reverted to all the recommended schemas
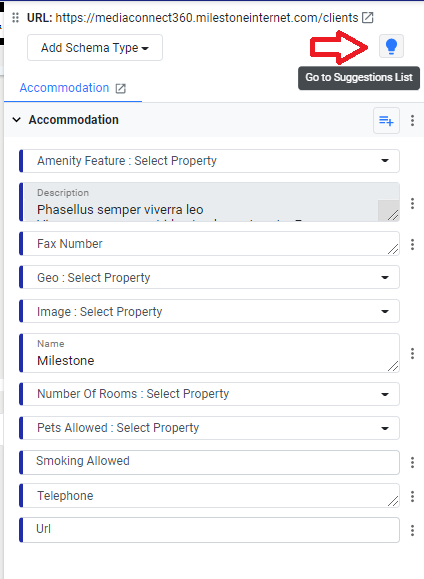
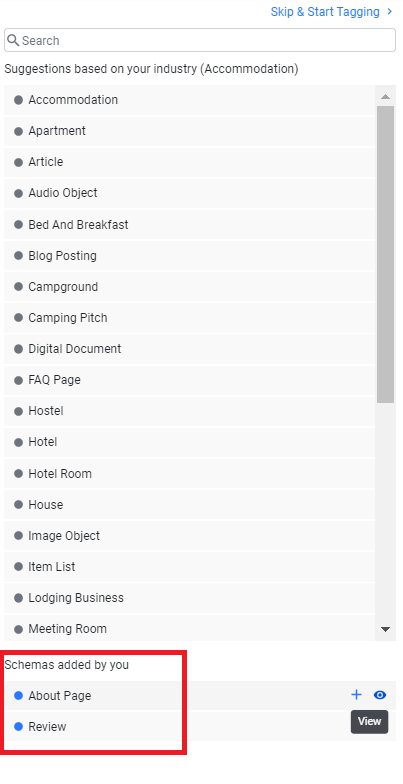
You will also see any additional schemas that have been added by you at the bottom of the list of recommendations. Click on the ‘view’ button if you wish to view the added schema.
The dots against the schemas display the published status. A published schema has a green dot against it. The schemas which are yet to be published and are in draft appear as blue. Any schema which is yet to be added has a grey dot against it.
3. Auto-detect schema
Opportunity: Reduce manual tagging and improve the speed of tagging and publishing repeating schema types or properties on a web page
Solution: With
the Auto-detect, similar items that need to be tagged on a web page
will be automatically tagged
Note:
For Auto-detection to work, it is recommended that there should be 3
or more repeating instances of similar items to be tagged.
The auto-detect option is available at a schema level and property level.
Let's show you instances of auto-detection of similar items on a web page at the schema level.
MPC > Schema > Schema Audit > Schema Editor
Example 1: Using auto-detect to tag multiple FAQS
For a page that has multiple FAQs like in the example below, tagging multiple FAQs could prove to be time-consuming. And here’s where the auto-detect function comes as a great help.
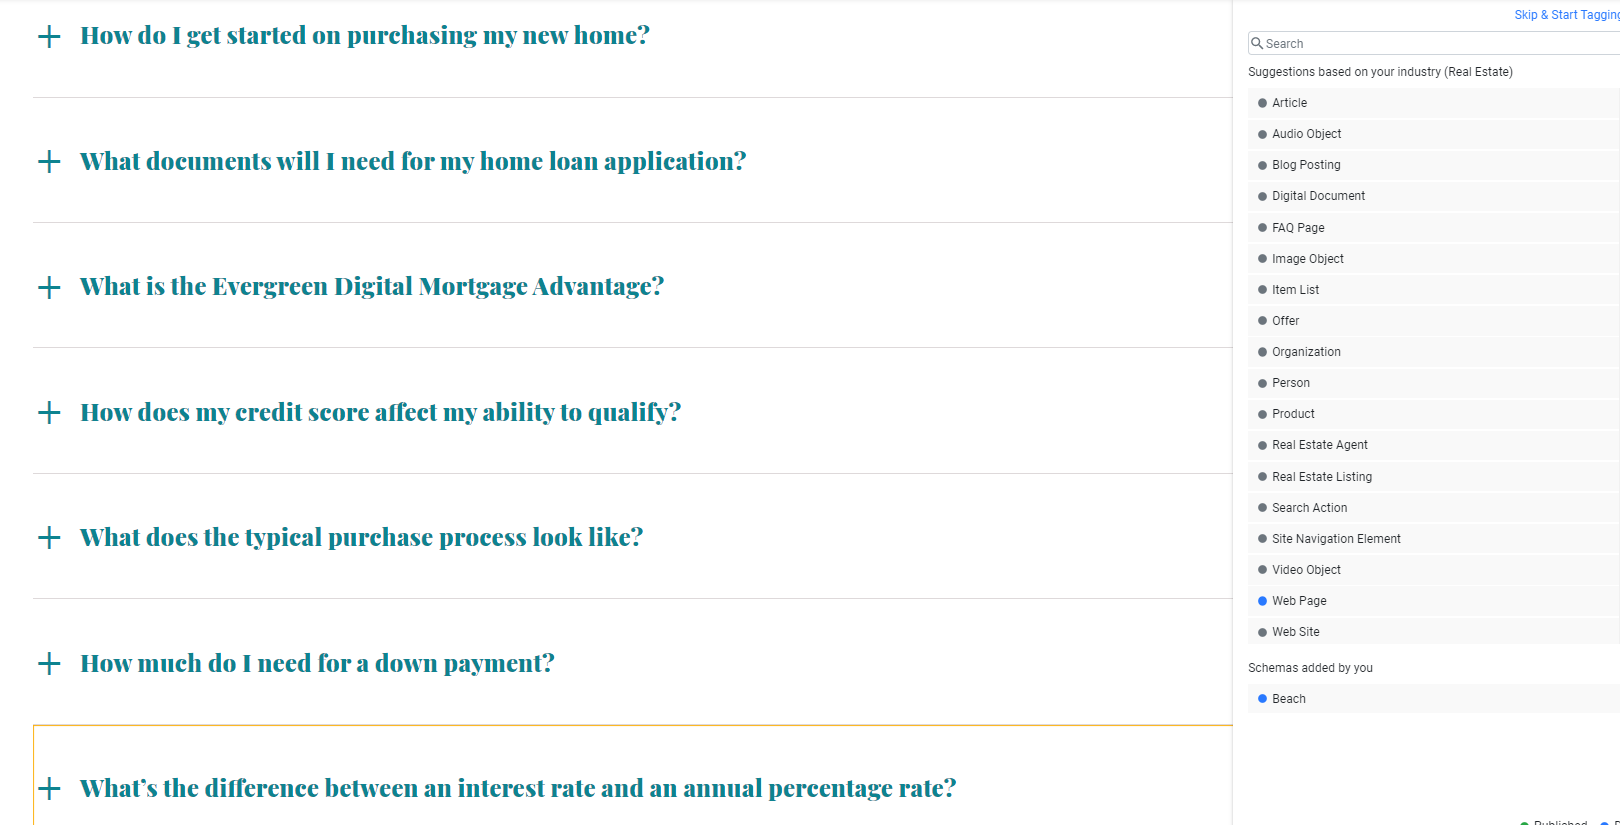
If you wish to tag multiple FAQs on a single web page, tag the first FAQ using the point and click functionality and then click on ‘Auto-detect’.

The Auto-detection preview will show you all the FAQs that have been automatically tagged. You can choose to remove any FAQs from the preview, using the ‘X’ mark. If you’re happy with the preview, click on ‘Add to Editor’.
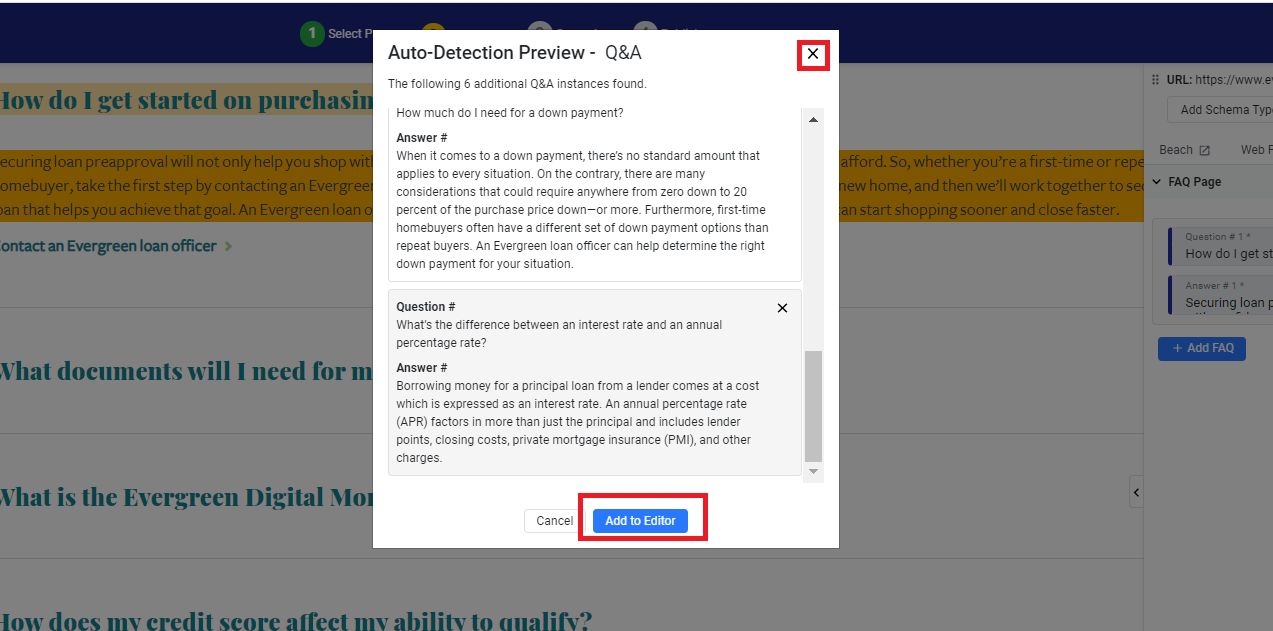
All the FAQs will automatically get added to the editor saving you the time of manually tagging each instance of an FAQ.
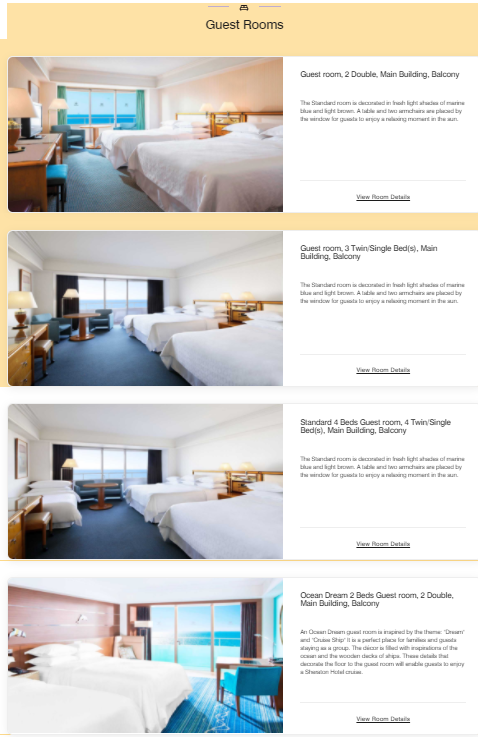
Example 2: Auto-detecting multiple Hotel Rooms.
Here too, there are multiple rooms to tag which would require quite a manual effort. Using the auto-detect function you can tag multiple rooms in one go.
In this case, select the ‘Room’ schema type and enter the properties such as name, description, image URL, etc., for the first instance Click on the 3 dots by the schema type and select ‘Auto-Detect’.

All the similar elements on the page will be auto-detected. Click on ‘Add to Editor’.
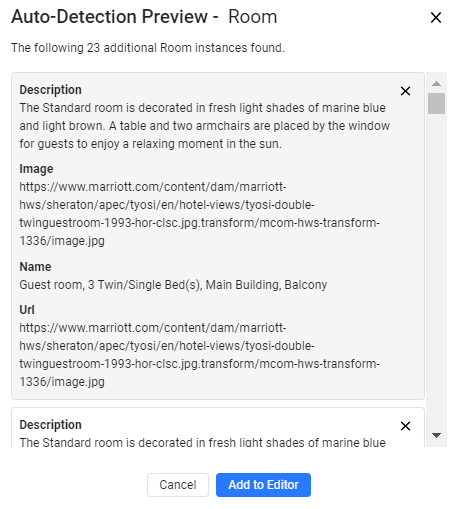
You will see all the similar elements added to the schema editor.
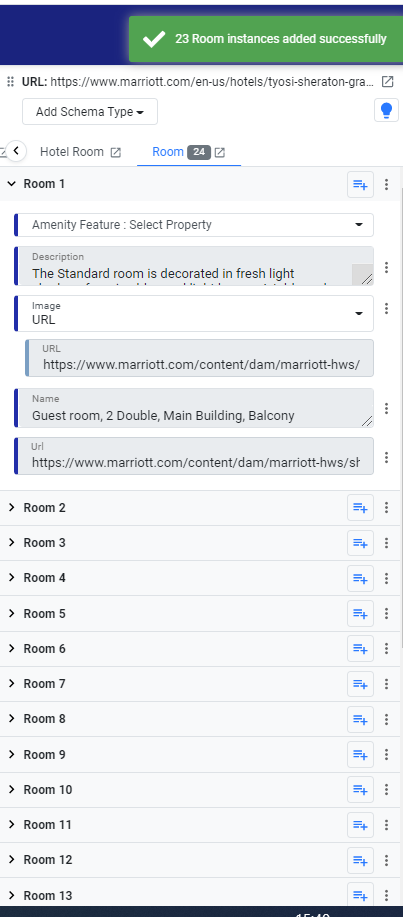
Note: The auto-detect function works for items in a similar page structure like in the case below.
Auto-detection at property level:
Let’s now show you auto-detection at the property level.
In this example, there are multiple items that could be tagged at once and you can do so using the auto-detect feature.
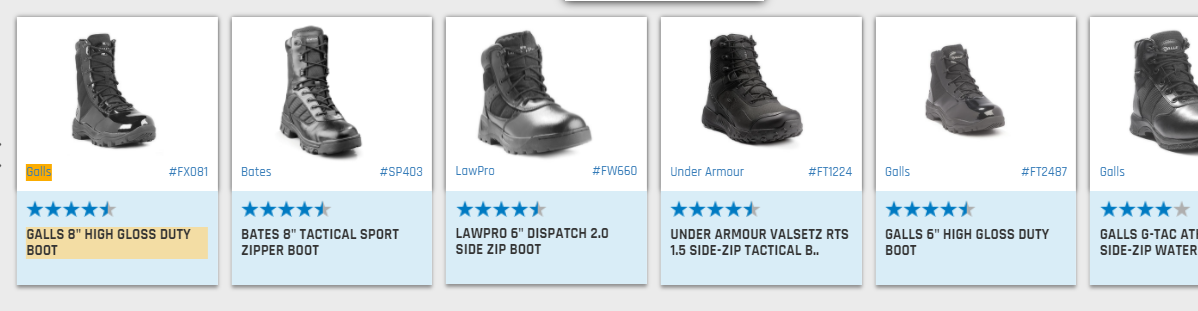
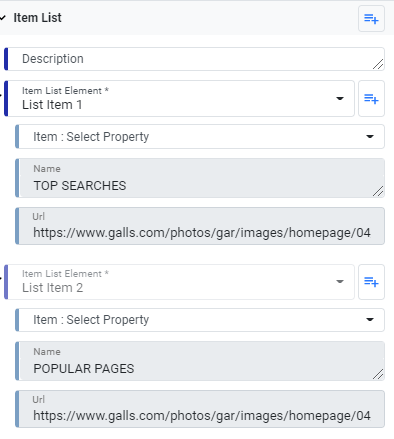
Select the schema type and tag the name and URL of the Item List property using the point and click functionality. Right-click on the property and choose ‘Auto-detect’.

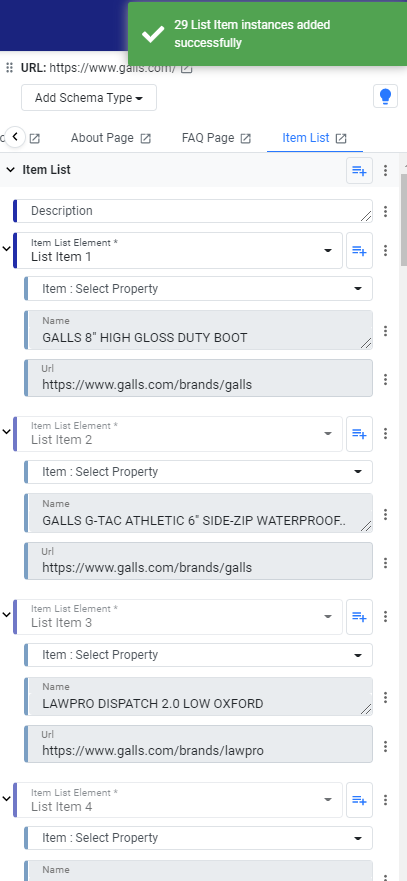
The auto-detection will detect the other similar instances of the property on the page. Click on ‘Add to editor’.
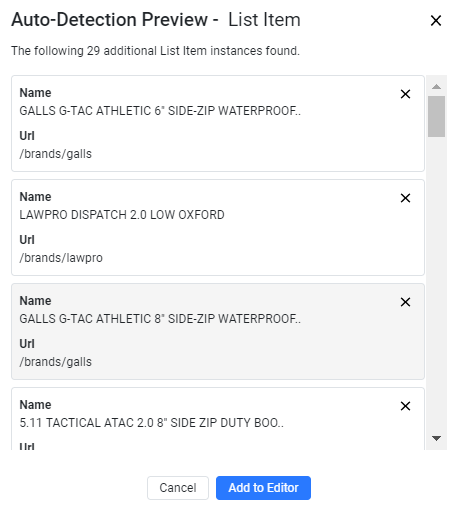
The other instances will be added to the editor.
4. Automatic tagging of positions of List Item schema
Opportunity: Eliminate manual entry of the positions of list items
Solution: The position of the list items is now automatically generated when the schema is saved and generated.
Previously, you had to manually enter the position of the List Item.
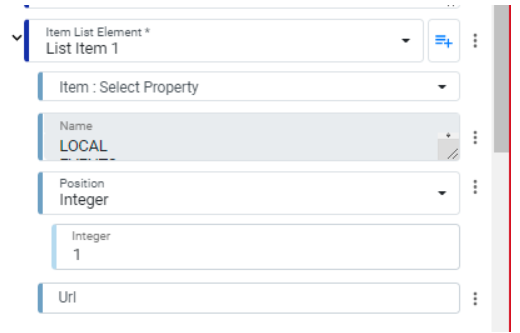
Now, all that you need to do is enter the required properties for an Item List and the positions are automatically entered when saved and generated.
Once saved and generated, you will see the positions of the List Item automatically generated.

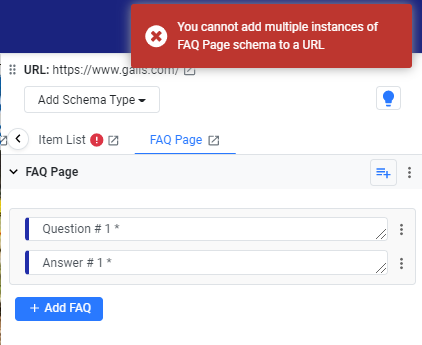
5. Allow one instance of FAQ, How-to, and Web Page Schemas for a single URL
Opportunity: Maintain schema accuracy and compliance by ensuring that certain schemas appear only once on a web page.
Solution: We now have a clear call out if FAQ, How-to, and Web Page Schemas are tagged more than once on a single web page or URL.
6. Automatic tagging of the URL for breadcrumb schema
Opportunity: Improve speed of manual tagging for breadcrumb schemas
Solution: When manually tagging a breadcrumb schema, the URL of the breadcrumb schema, if present, will automatically get tagged when the Page Name is tagged

Analytics
1. Filter scheduled reports using ‘My Reports’ and ‘Scheduled for Other’ reports
Opportunity: View and edit reporting schedules
Solution: Now filter reports that you have scheduled for others and the reports that you have received
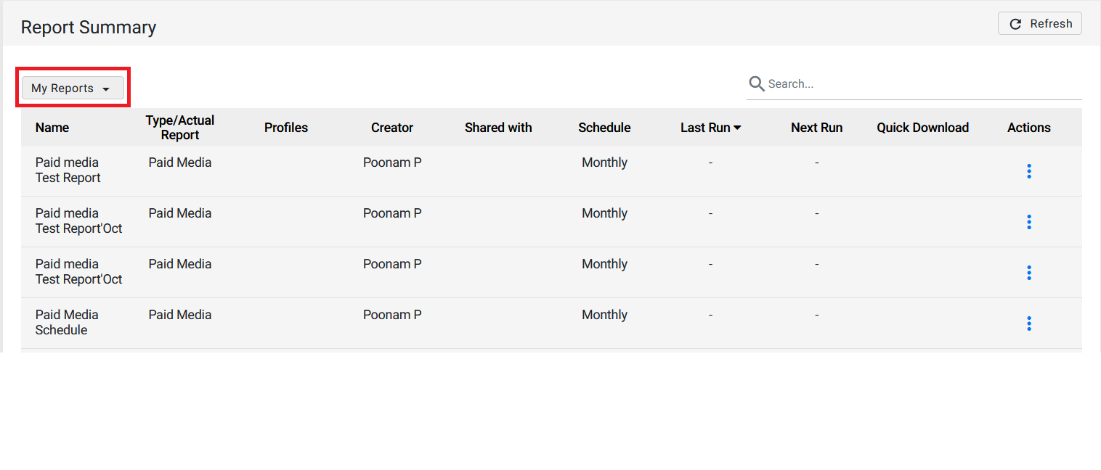
My Reports: This is the default selection that shows schedules created by the user, or for which the user is the recipient
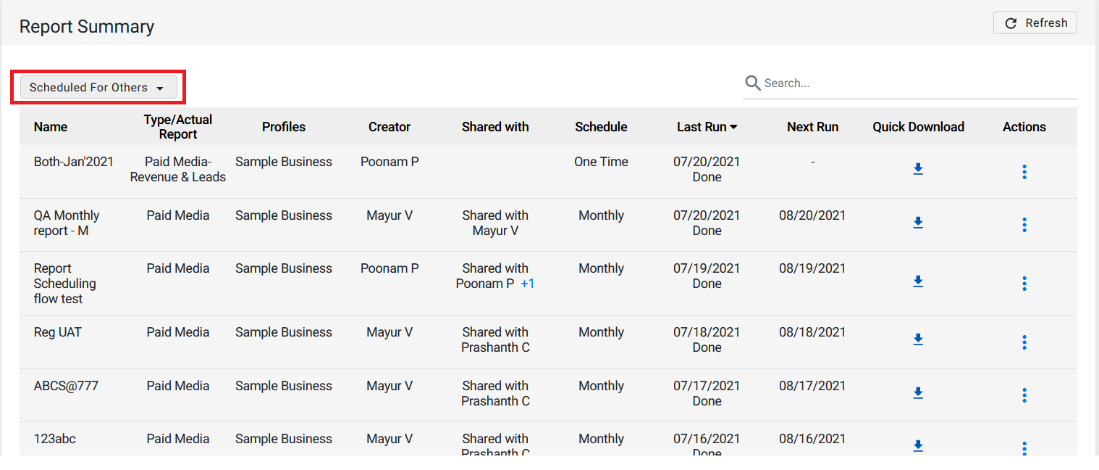
Scheduled for others: This option will show all other schedules except ‘My Reports’ tab. This tab will be only visible to specific Roles = Global Administrator, Agency Administrator, Accounting, Business Administrator.
MPC > Reports > Report Summary
From the Dropdown on the top left select ‘My Reports’ or ‘Scheduled for Others’
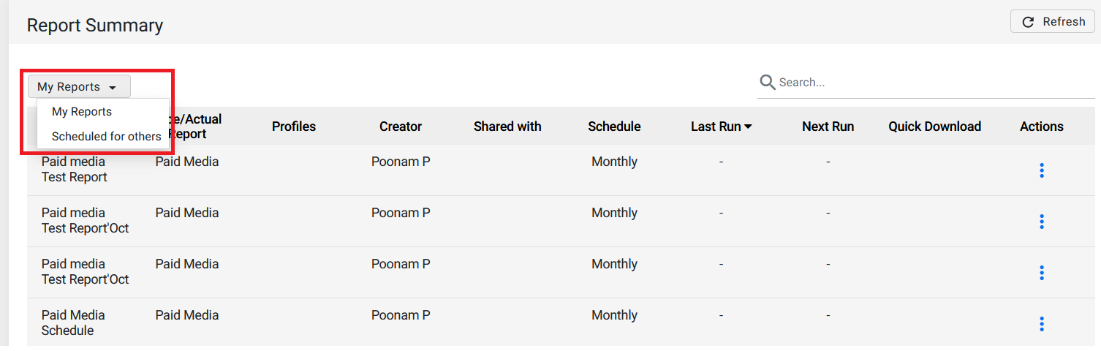
‘My Reports’ only displays the reports that you are a recipient of, or you have scheduled
‘Scheduled for Others’ only displays reports that have been scheduled for others to receive
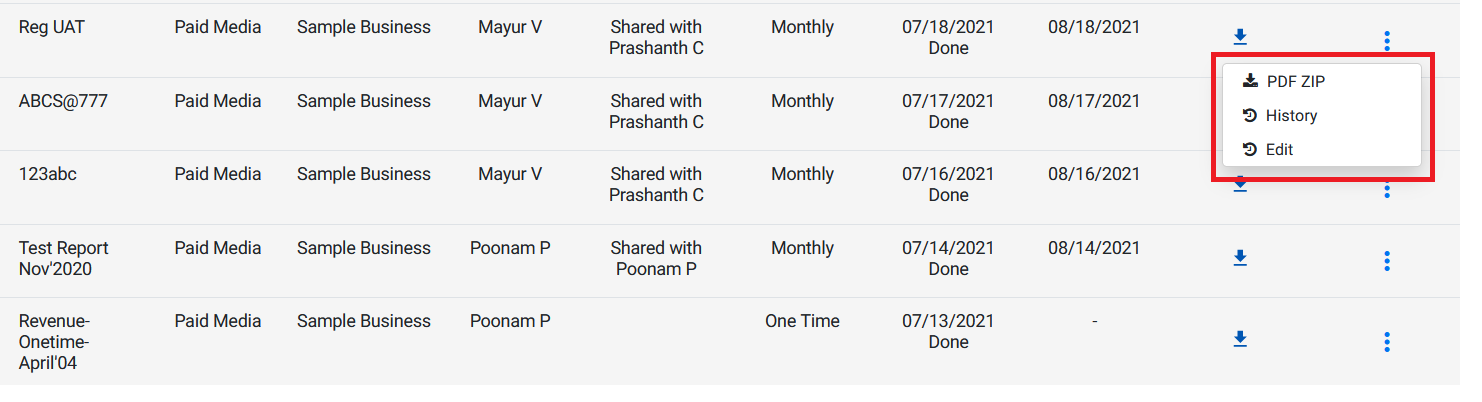
You can edit the details and schedule of a report by clicking on the three dots to the right of the desired report
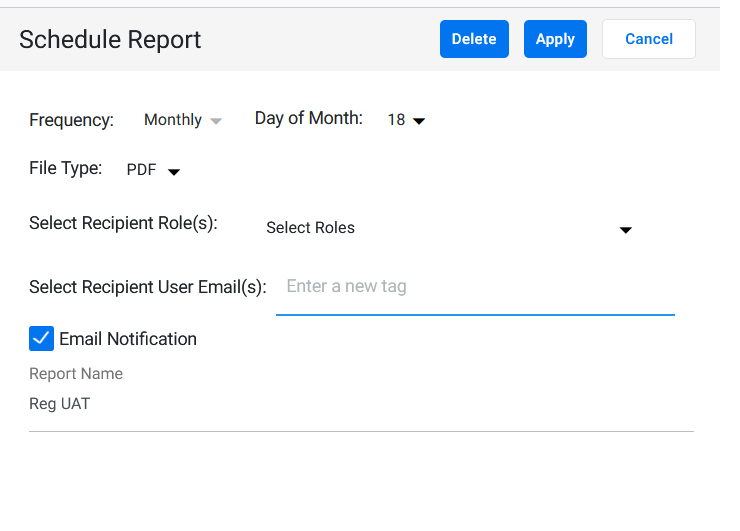
The ‘Schedule Report’ tab will allow you to edit the schedule and recipient(s) of the report
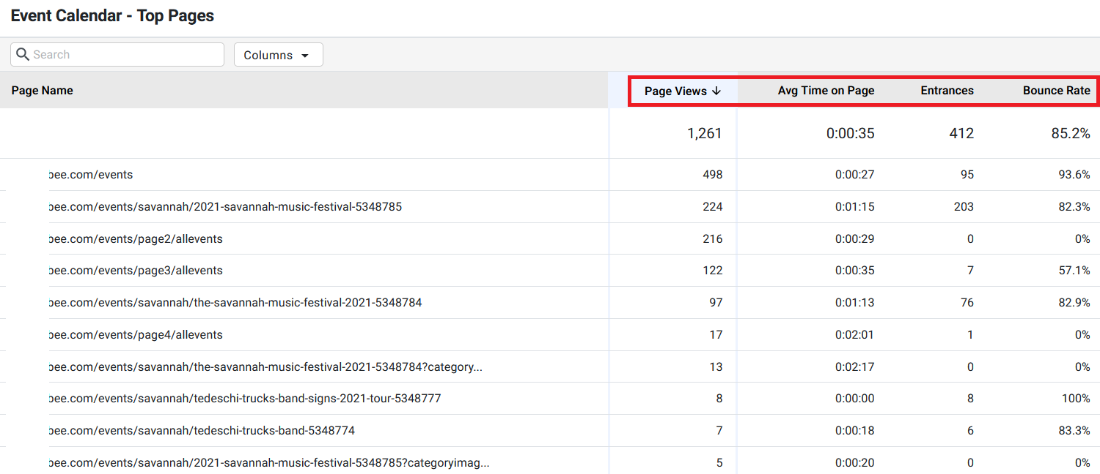
2. Top Pages from the Events Calendar
Opportunity: View the events that are gaining the most traction on your website.
Solution: The ‘Event Calendar – Top Pages’ section now shows you which event pages users are viewing and various metrics related to it
MPC > Analytics > Website Performance > Event Calendar
In the ‘Event Calendar’ section scroll to the bottom to view the ‘Top Pages’
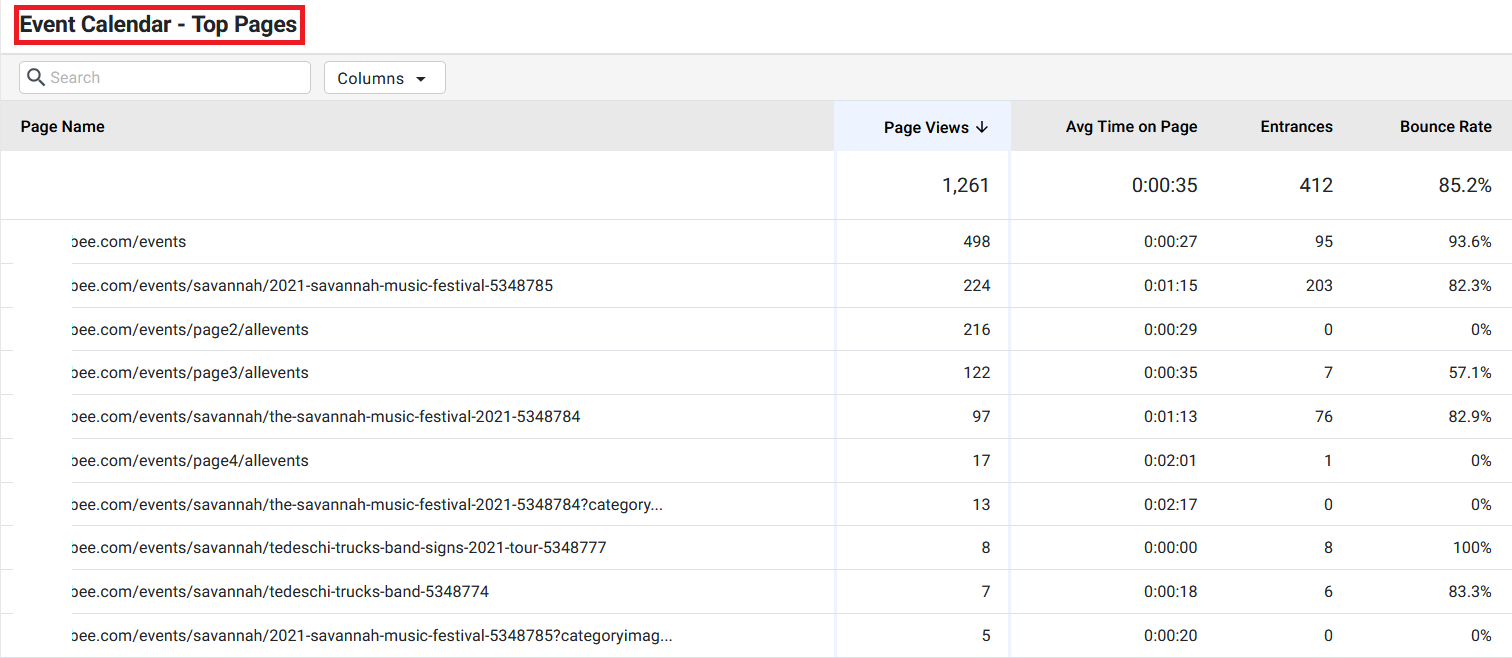
The ‘Top Pages’ section displays data like:
- Page Views: Number of times users viewed Event Calendar pages.
- Entrances: Number of times users entered the website by landing on an Event's page.
- Avg. Time on Page: Avg. time users spend on an Event's page.
- Bounce Rate: Percentage of sessions on Event Calendar Pages in which users viewed only a single page and exited without interacting with the pages.
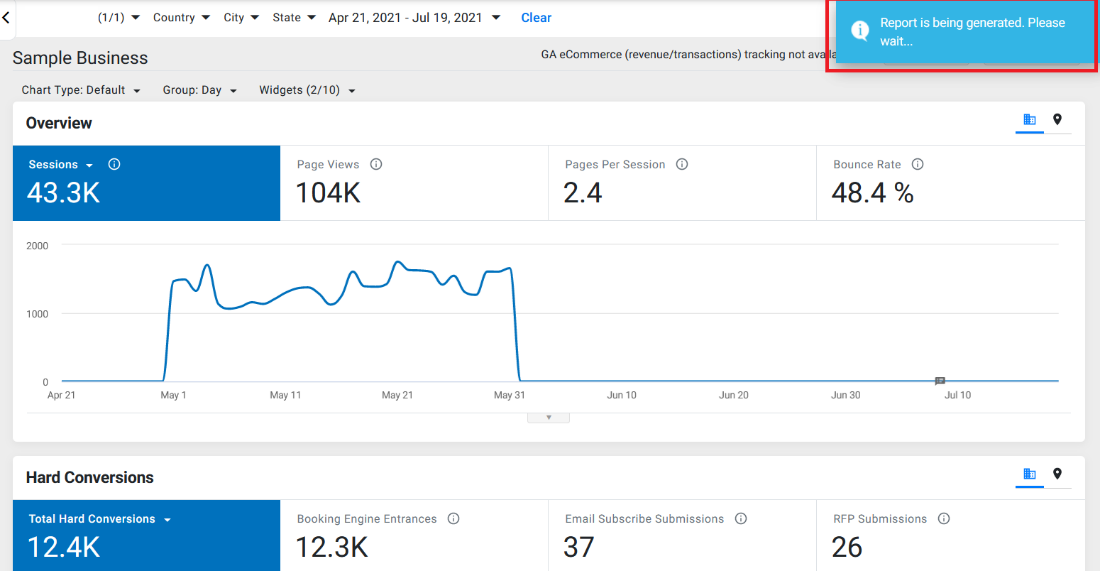
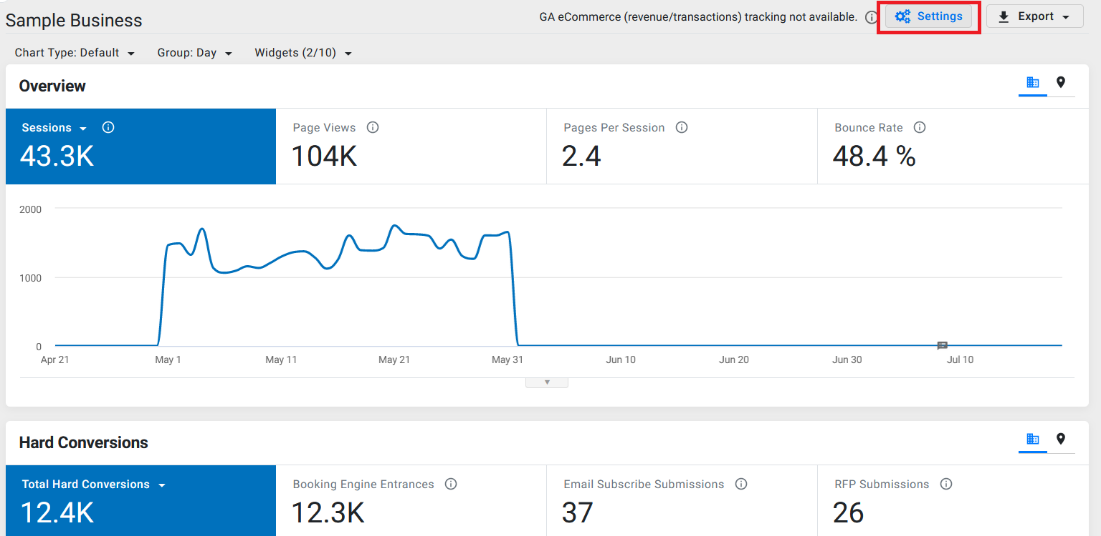
3. Download widget or Export UI as PDF reports
Opportunity: Download widgets as PDFs for easy sharing and reuse
Solution: You can now ‘Export’ widgets to PDF documents share across channels easily
Note: For now, only applicable for Website Performance Overview, other tabs are in progress.
MPC > Analytics
On the ‘Analytics’ homepage open the ‘Settings’ tab for the widgets
Select the widgets you wish to add in export PDF report for
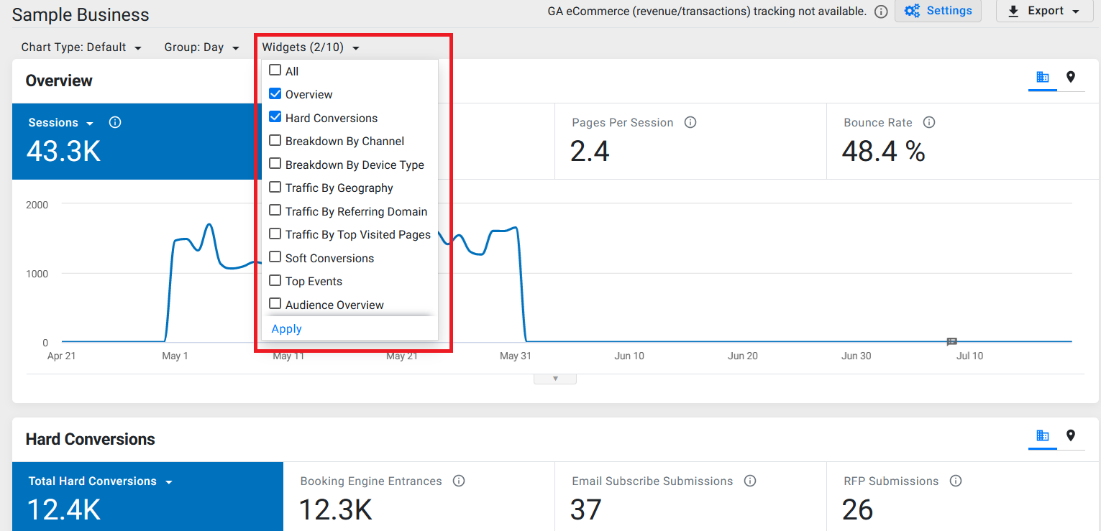
Click on the ‘Export’ button on the top right
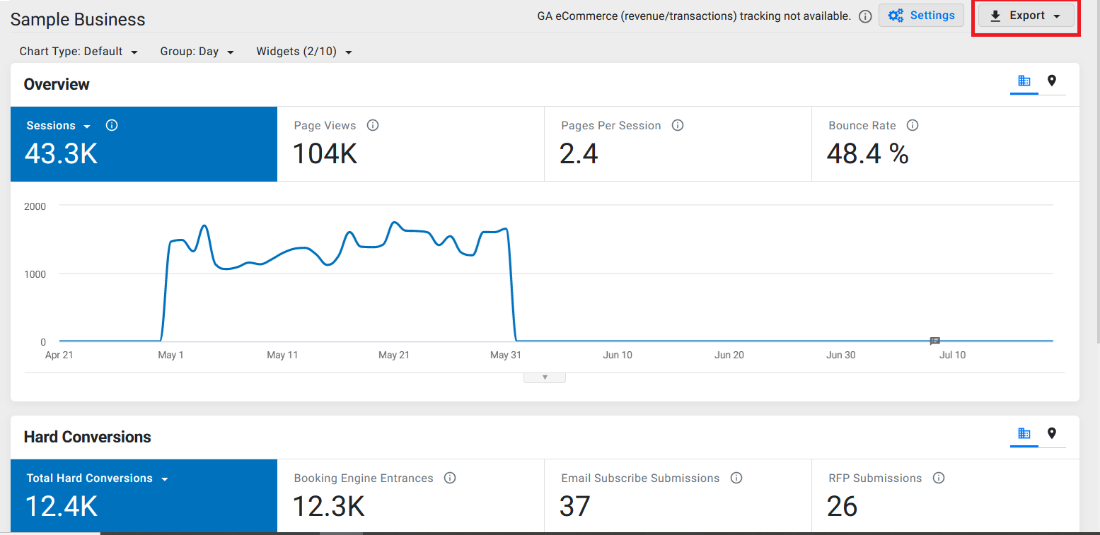
A notification will show that your PDF is being generated